Showing posts with label dinner. Show all posts

Wednesday, June 4, 2014

Bean Chimichangas and Spanish Rice

Monday I finally got a rice cooker! I'd been wanting one for so long and I finally got one. It's a cute little guy, perfect for just Trevor and I. Well, I wanted to break in my new kitchen toy and needed a main dish to go with my rice. So, I happened upon this recipe for bean chimichangas. YUM! Fast and easy. You can view the original recipe here. This was an excellent easy recipe. I had Trevor in the kitchen to help me and we made these in probably about 20 minutes.


Crappy picture I know, but Trevor and I had both eaten a whole chimichanga before I realized I hadn't taken a picture. I was torn. I didn't want to stop eating these for long enough to get a good picture. I know food is like an art on other blogs, but here - I'm realistic. My food doesn't often turn out pretty, but it sure does turn out tasty. Anyway, I combined our plates quickly, snapped a picture and then went back to eating. 

If you're aiming for healthy, this might not be the best meal, but it sure is good comfort food. And really, if you take out the half block of Velveeta, it's really pretty healthy. 


Ingredients: 
Tortillas
1/2 can of Rotel
1 can refried beans
1/2 brick of Velveeta. 
Egg whites. (we used 1 egg and still had plenty)
Cheese (If the Velveeta isn't enough for you :)
1-2 tbsp of veggie oil

1. Warm beans, Rotel and Velveeta in a pot. Make sure the Velveeta is all mixed in. 
2. Warm up a pan on the stove with a little bit of oil. We are going to flash fry the chimis. (This was a new technique that I hadn't tried before. Took a little getting use to, my stove is tends to be extra hot, so I burned the first two). 
3. On a tortilla, put some of the bean mixture into it. I found that it naturally wanted to go flat, like a soup on the tortilla. So this part was a slight challenge. 
4. Baste a little bit of the egg whites around the edge of the tortilla. This acts as a sealant. Then fold up the tortilla in a burrito like style.  Top and bottom, then left and right side. 
5. Flash fry these in the pan on the stove. I only left mine on there for about 30 seconds on each side. But my stove has 2 heat options. High or off. There is no medium or low. 
6. Next, move them to a pan and let them back in the oven for about 12 minutes at 350. 

How easy right! What's awesome, is we had leftover bean/Velveeta mixture. Last night we put it on top of our baked potatoes. Wow. YUM! This was an excellent dinner. It had a bit of a kick to it, so be cautious with the Rotel, it holds a lot of heat! I also made some quick Spanish rice to go with it. You can view the original recipe here.

I just put all these ingredients in the rice cooker, gave it a stir and pressed start!

Ingredients:
1 1/2 cup of long grain rice. 
1 1/2 cup chicken broth
1 can of Rotel tomatoes (I only put in a few spoonfuls and it was really spicy!)
2 tbsp of melted butter
1 tsp of cumin


Enjoy!

-SamiMae

Saturday, May 10, 2014

Black Bean Pitas! YUMMY!

This was a meal that was very surprising how good it was! I was unsure when I was putting everything together, but this could have made it into the top 10 for spring meals. Trevor was even impressed. We just happened to have everything on hand too!

Ingredients:
  • Pita bread
  • Black beans
  • Corn
  • Romaine lettuce
  • Bacon
  • Celery (optional, I thought it was ok)
  • Sugar
  • Olive Oil
  • Mayonnaise
  • Vinegar
  • Pepper 
  • Onion
This came together in less than 15 minutes. It's eaten cold. I'm sure if you let it sit and let the flavors blend it could be good, but keep the bacon out until you eat to prevent it from getting soggy.

1. Cook some bacon. We did about 4 strips.
2. While Trev cooked the bacon, I drained a can of black beans and a can of corn and put into a bowl.
3. I cut up a little bit of green pepper (you want something sweet), onion and celery. I went easy on it. I cut everything small. Maybe 2-3 teaspoons worth of each. Add into bowl with beans and corn.
4. Add in 2 tablespoon mayo
5. Add teaspoon of sugar and olive oil and vinegar. 
6. Go off of taste, if you don't like it, mix it up. We added in a bit more sugar. 
7. Add bacon and mix it up. 
8. Get a pita bread, layer some romaine lettuce on it and put a few good scoops of the bean mixture on top and enjoy!


This was a surprising mixture. I found a recipe that I based it off of. You can view it here. I was really worried about it, but then the flavors worked together great. I loved the raw veggie flavor. The onion and peppers were quite wonderful. The sugar helped give it more of a dessert feel than a pita full of veggies. We ate the whole thing! 

- SamiMae

BLTs - A wonder!

I don't have pictures, but I made real BLTs this week. No bread, just bacon, lettuce and tomatoes. It was amazing....I'd never had it before.

I added a bit of mayo to the romaine lettuce, right on the lettuce, topped it with tomatoes and a strip of bacon on top. I am so doing that again! Remember this dinner!

- SamiMae

Beef Haystacks

A few weeks ago I made a meal that was quite tasty. I love haystacks of any kind. This was no exception! I have some great beef in my freezer that I try to use whenever I can. It's already cooked and frozen. So, for this recipe I just took out some beef, and warmed it up. This dinner came together pretty quick.

Ingredients:
- Beef
- Lipton's Onion Soup mix
- Veggies of choice ( we chose peas)
- Rice
- Haystack toppings: cheese, pineapple, green onions, sour cream...etc.

1. Heat/cook beef. I added 1 can of beef broth as well. 
2. Add in half a package of Lipton's Onion soup mix. 
3. Once this is warm, take the beef out, temporarily. I learned that you don't want the beef to boil in the mixture because it'll make the beef tough.
4. Add some cornstarch to the mixture. Make sure to have already combined it with cold water to activate it. Bring to a boil for 1 minute. 
5. Add back in the meat and add in any veggies you'd like.
6. Top on rice with haystack toppings. We like pineapple, cheese, green onions and sour cream. Of course, I really love sour cream, it's weird - I know. 


This was really good. The beef flavor was amazing. Be sure to salt and pepper it to taste. So, yes, I do add sour cream to mine. I love the flavor and it makes it creamy. :) Anyway, this was another easy and cheap dinner for us.

- SamiMae

Zucchini Pizzas

I made this dinner a few weeks ago and just haven't been able to blog about it yet. I've seen a lot on Pinterest about doing meals with zucchini. I managed to find a small one at Smith's and decided to give it a try.

1. Cut the zucchini in nice thicker slices maybe  1/4th to 1/2 inch. Baste in olive oil and cook for about 3 minutes on each side. 

2. Put a little pizza sauce, or tomato sauce with seasonings (which is what I do), then top with a little cheese. 

3. Broil until cheese is melted or personal preference.


I didn't think these little guys would be filling, Trevor was super sceptical at first. But I think I cooked 2 zucchinis and they filled us both up! Quite tasty. They remind me of pizza pockets - but much healthier! 

- SamiMae

Pita Pizzas

I got this great idea off of pinterest to make pizzas on pitas. So, at Costco a few days ago, I got some yummy pita bread. This little pizza, which was quite tasty and filling had:

Ingredients:
  • Chicken
  • Cheese
  • Green Onion 
  • BBQ sauce
This would have been great with veggies too! Just pop it in the oven until the cheese is melted. It's great for a night when I really don't want to cook!


- SamiMae

Tuesday, March 25, 2014

Yummy Salad

Sunday night, we had a bit of extra lettuce, apple and avocado. I whipped up some chicken to top it with. So, I turned it into a salad. I wish I had a cucumber, red onion, and cherry tomatoes. It was tasty even without that stuff though.. I put a bit of raspberry vinaigrette on it  and it was quite tasty. 


- SamiMae

Wednesday, March 19, 2014

Haystacks with Veggies

So last night as I was thinking of what to cook, I found a recipe that had broccoli in it and looked really good. But after looking at the ingredients, I realized its just haystacks with broccoli in it. lol.

But, I still made it. It was tasty. I added some garlic and onion seasonings in it to give it a bit more flare.


- SamiMae

Wednesday, March 5, 2014

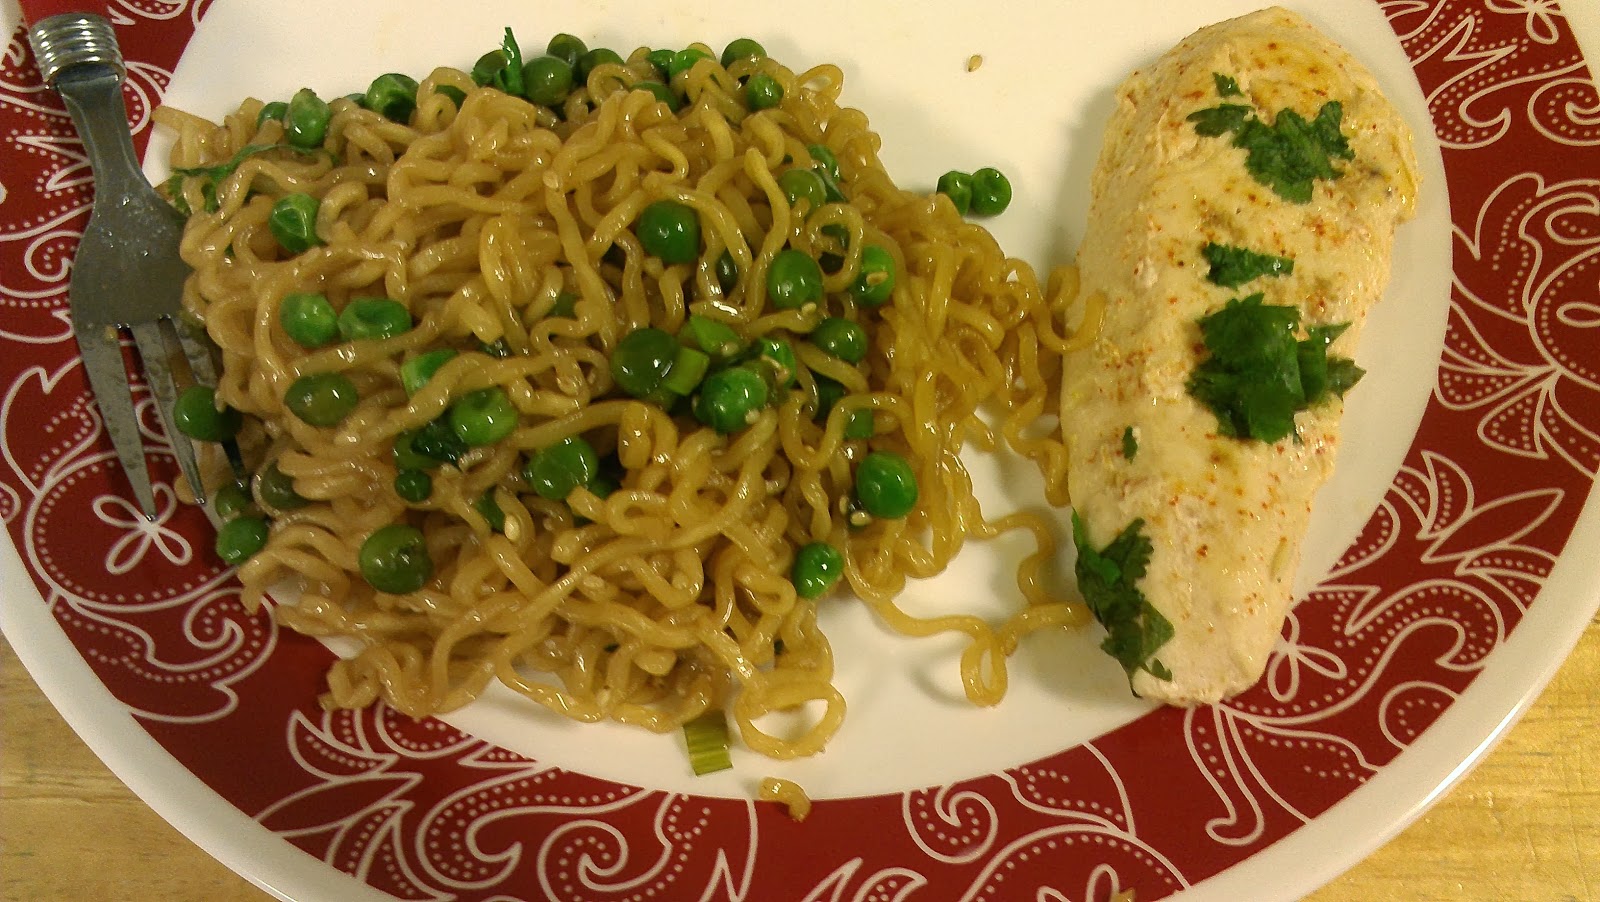
Cilantro Ramen Noodles

I have quite a bit of cilantro and need to figure out how to use it up before it goes bad. Last night I made the Cilantro, Lime and Garlic Chicken but wanted a side dish. I was tired of rice or pasta noodles. So after a while of Pinteresting, I found this recipe. I changed mine up quite a bit, but got the idea from the Noble Pig blog.

I gotta say, I was worried, but it turned out pretty good!

Ingredients:
- 2 packages of Ramen noodles (any flavor, we don't use the packets).
- Mr. Yoshida's seasoning
- Peas
- Sesame seeds
- Green onions
- Vegetable oil
- Cilantro


1. Gather ingredients. Cut up green onions and cilantro ahead of time.
2. Cook the Ramen in boiling water for about 3 minutes
3. Drain Ramen and rinse it with cold water.
4. Leave Ramen in strainer, temporarily.
5. Use a LITTLE bit of oil to saute the green onions and warm the peas up. I used a bit to much and mine was a little oily, I had to drain some of it out. 
6. (Optional), I would recommend draining this oil out after it's sauteed. The Mr. Yoshida's has quite a bit of oil already in it. 
7. Pour in noodles, and some Mr. Yoshida's. I sprinkled some sesame seeds in there, just for a bit of flair. 
8. Stir and Enjoy!

This could have been great with broccoli or snap peas instead or in addition. I found it a little difficult to mix everything together. The peas didn't want to mix in with the noodles, so I just dished it out on top. 

In the pan, about ready!

Ta-Da! Dinner is done! 


- SamiMae

Cilantro, Lime and Garlic Chicken

So, I bought some cilantro this week and wanted to try to use most of it. So, I gave this idea a shot! It was risky and I didn't know if it'd taste good, but it worked!


Ingredients:
- Chicken
- Chili Powder
- Cumin
- Garlic
- Lime
- Cilantro
- Green onions
- Vegetable Oil


It's super easy. :)

1. Put a little bit of oil in a pan and spread it around the pan. Start heating it up while you put your chicken in (I used frozen chicken breasts).

2. Sprinkle some cumin and chili powder on it. I went really light with mine, afterwards, I realized I could have put some more on.

3. Sprinkle on the garlic and green onions as well. These become sauteed in the pan with the chicken.

4. Squeeze 1/4th a lime on it. I went easy, you can customize how you'd like.

5. Cover and let cook for a while.

6. Just before it's completely cooked, turn chicken over to cook the other side.

7. Sprinkle some chopped cilantro on top, cover. Turn off heat and let the chicken sit for about 7 minutes so it can absorb the seasonings.


Pretty simple ingredients

Green onions, garlic, cumin and chili powder

Final product. YUM!

I served this with the Cilantro Ramen Noodles. The Cilantro in the meal wasn't overpowering at all.


It's pretty easy. You really can't screw this up. Adjust the spices to whatever you prefer. I went easy because I'm still learning the strength of some of my spices.


- SamiMae

Saturday, February 8, 2014

Leftover Success - Bean and Rice Burritos

So, dinner tonight gave me a challenge. I had leftover rice, beans, corn and diced tomatoes. I also had an avocado that I needed to use soon. After a few minutes on Pinterest, I came up with the idea to do rice and bean burritos. I made guacamole for our chips and salsa I already have. We made up some homemade tortillas and BAM! Dinner!

The rice gave me a bit of a challenge. I've never made mexican rice before, and I wanted to keep it simple. Many recipes said use tomato paste. I was thinking about using tomato sauce, but went with the paste instead. Well, I should have had about another cup of rice to even things out. It was very...pasty. But, I think we recovered.

For the beans, this was pretty good. I sauteed some diced onion, red peppers and minced garlic in some canola oil. Then I added by leftover black beans and cooked those. After it was all warm. I added it to the rice. With a bit of cumin and some taco seasonings - hey, it was edible! Hahaha, Trevor actually, really liked it. This recipe just wasn't up to my normal level of creativity and awesomeness that most of my other meals are. I had quite a few set ingredients that I had to use, and I had to make it all work. Overall, at the end, it wasn't so bad. :)

Trevor made some homemade tortillas. We are getting pretty good at those homemade tortillas, they sure are better than store bought! That's for sure. While he was making the tortillas, I whipped up some guacamole.

This was interesting, because I had never made it before. I remembered from cooking in the kitchen with my mom, that it takes a little while to absorb the flavors of the things that's in it. Because at first, I added a ton of stuff, and it still tasted like avocado! See how I made the guacamole here!


Not too bad, eh?!


Ingredients:
- Rice
- Black Beans
- Corn
- Cumin
- Taco seasoning (optional)
- Diced Onion
- Red bell pepper (diced)
- Tomato Paste


1. Warm rice up, (or cook it), put in tomato paste, cumin, and tomato seasoning.
2. Saute onions, red bell pepper and 2 gloves of garlic (minced) together. After onions are cooked, add in black beans and corn.
3. Once rice is cooked/warmed, add in bean mixture.
4. Serve on tortillas as a burrito. (Ours were more like tacos, because they were so stuffed!
5. Top with sour cream, cheese, guacamole, salsa, whatever is your favorite!


What I love about this recipe, is how simple it is. This recipe is more like an idea. You can do anything you want with it, and customize it to your crowd. There is only Trevor and I so, we generally cook and prepare less. This was all natural really. Nothing was pre-made. Only the beans and corn came from a can. Everything else was natural. How awesome huh?! AND - it was meat free and very filling. :) Way to have an awesome meal on a tight budget.

This is one I think I'll make again. :) We used all leftovers from the night before, and all the leftovers got used! Success!

- SamiMae


Stuffed Bell Peppers

So, last night I made stuffed bell peppers. Secretly, growing up I never liked them. But I wanted to give them another try. I've learned the only way to like things, is to eat them. :) This was pretty tasty. I was able to eat about half the pepper, and then I was done, but the insides were really good! These were simple to make. They can be time consuming depending on how you choose to make them. This was another recipe I made from Pinterest. But, I made mine quite a bit different. You can view the original recipe here.

Ingredients:
- Bell Peppers
- Cumin
- Salt
- Diced tomatoes
- Black beans
- Corn
- Rice
- Meat (I used ground beef.)
- Cheese
- Green onions (optional)


1. Clean out peppers, remove seeds and veins. Let them dry
2. Start cooking rice. I used brown rice, no instant stuff. So, that took a while to cook.
3. Cook meat, add in cumin, salt, tomatoes, black beans, and corn.
4. Add rice to meat mixture after it's cooked. Season to taste if you feel it needs more.
5. Next comes the stuffing. Stuff each pepper full of the yummy meat mixture!
6. Cook peppers in the oven for about 30-45 minutes at 350, depending on your preference. Mine was about 35 minutes. Top with cheese and green onions.

I found that it was really good with ranch. That's how I was able to eat the pepper! I love peppers in dishes, but to eat one whole or raw or even cooked can be a challenge. But, nonetheless, this was a tasty dish! Trevor ate the whole thing! For being in a pepper, it was pretty mild on heat and taste. Give it a shot!

We only cooked two peppers, and had quite a bit of leftover rice stuffing mix, so we put it in the pan with the 2 peppers to cook to eat later. (We actually used the leftovers tonight for dinner. :) Along with our stuffed peppers, we had a salad and my yummy homemade bread.


- SamiMae

Thursday, February 6, 2014

Lick the Bowl - Chicken Enchilada Pasta

This was an AMAZING meal. So good, that I didn't manage to get pictures of the final product. Hahaha. This one is a MUST. It was super easy, and it tasted so good! I got the idea off of Pinterest, but did mine quite a bit different. View the original recipe here.

This is better then hamburger helper, and probably quicker. I'm so excited about this meal, I was worried, and experimented. I also had to feed this to my mother-in-law. I was hoping it'd turn out edible, but it is probably one of my new favorite. I'm a huge fan of enchilada's and this just took it to a whole new level.  Are you ready?

Ingredients:
- 2 chicken breasts (or a can of chicken. I did 2 breasts, and the flavor and texture were great.)
- 1 can of enchilada sauce
- Noodles. (I used bowtie)
- Sour Cream
- Cream cheese
- Diced onion, or minced (Optional.)
- Crushed garlic, or garlic powder. (Optional.)
- 1-2 tablespoons of veggie oil.
- Shredded cheese. (Optional.)
- Green onions. (Optional.)


Yup, that's it. You can add any seasonings you'd like. I really like the enchilada sauce that I use. I don't put amount sizes because it differs for everyone.  Now, I'll explain my process.

1. Cook the chicken breasts in some vegetable oil. Add in some diced onion and garlic while it cooks. It adds great flavor! If you are using a can, you can skip this step.

2. Boil your water, and begin cooking your noodles.

3. Warm up enchilada sauce. When I make my enchilada I use this:


This stuff is a small brand I've never heard of, but this is liquid gold in a can. Amazing heavenly goodness. I found this at Winco I believe. I need to pick up some more, because we use it so much.

So, I cooked this, it was a little spicy, and my husband and mother in law are a bit sensitive to heat. So that's where a couple scoops of sour cream come in handy. Well, that wasn't quite enough. So I added in a few tablespoons of cream cheese. Feel free to get creative and try adding different spices to yours. I continued to heat this on the stove. Then, this mixture did something awesome! It began to thicken and...kind of enlarge in size. I could just tell by looking at it, that it was ready to get dumped on my noodles!


4. Dump over noodles, stir. Top with cheese and green onions. I love green onions, so for me, those really made the dish. This dinner had so much flavor! It was gobbled down and almost gone by the time dinner was over. Everybody had a nice helping of seconds.


Top with some green onions and cheese.

Again, this dish was so good, I didn't get a final picture because it was so good and I didn't have leftovers. I was so excited about this meal that I forgot to take a picture before I began eating!

I served this dish with a salad and a side of veggies. Super quick and cheap meal to make. I'm doing this again!

- SamiMae

Tuesday, February 4, 2014

Mr. Yoshida's Beef Fajitas

Last night, I wanted to make some more tortillas. They were just so tasty the first time. I didn't want to cook any chicken, and I realized I hadn't cooked any beef for a while. So, I pulled out 2 of my "beef slabs" from when I previously cooked my 5 lb. roast. All it is, is 2 thick slices of that roast, with the juices it cooked it. It has quite a bit of flavor on it's own.

I pulled the 2 slabs out and cooked them in my wok. I love using my wok, I love stir-frys and love Asian flavoring and food. I'm trying to expand my cooking abilities to include Asian food. Last night, I had to come up with it on my own, based on the ingredients I had. Pinterest was of no help to me, but that's ok. So this, as simple as it is, I do believe I can call an original. :)

I thawed the beef in the wok, it had some nice juices it was cooking in. I have a little grate that sits on top and I put some veggies on it to thaw. I keep bags of frozen veggies in my freezer. When I go grocery shopping, I'll pick up an extra pepper or onion. Then I'll come home and slice it up and freeze it. I usually rotate these out pretty quick. So, I got everything cooking/thawing.

After that was done then I had to decide what seasonings to put in it. I poured in a bit of Mr. Yoshida's seasoning. You can find it at Costco. It's my favorite. :) This seasoning gives it a sweet taste. I also added in a bit of cumin, and an extra onion seasoning, let it all mix together and simmer. I must say, I was impressed with the flavor. This was quite a great meal. :)

Ingredients:
- Beef
- Red bell pepper, sliced
- Green bell pepper, sliced
- Onion, sliced
- Cumin
- Mr. Yoshida's
- Optional: minced onion. I used this because I didn't put enough onion in it to give it much flavor.
- Tortillas
- Toppings, cheese, sour cream, lettuce, cilantro

I found that the meat had a lot of flavor when I dipped it in the sauce and then put it on my tortilla. I also made some rice-a-roni "fried rice". Pretty bland, but it was nice to have a side dish.


I love the color that the red and green peppers add. The sauce, is where a lot of the flavor is. 

Not too great of a picture, but man...this was SO GOOD! 

My favorite thing about cooking is, it's an experiment. Forget the measurments. Each time a recipe is made, it's going to be altered based on amount of people. There is only Trevor and I eating, so I have to cut back on a recipe. This usually forces me to just look and see what ingredients are in a recipe and then go from there. It's fun to go off of taste and smell. It makes it unique and not just "some recipe". It also improves a cook's skills. I've found that since Trevor and I have been married, that my cooking has improved exponentially.

And, if it does turn out horrible? Worst case scenario? Scrap it, and make mac and cheese. :) HAHAHA. (I think I only offered to do that once, when we were first married.). I learned a lot.


-SamiMae

Wednesday, January 29, 2014

Homemade Fajitas

I love fajitas. Whenever we got to Chilies, that's what I get. So today, I decided to make some, to go with my homemade tortillas. I used the Six Sisters recipe. It was pretty good. I think next time I'll do it a bit differently. I stuck pretty true to the recipe on this one. I love using my cute little crock pot, that's why I chose this recipe.

Ingredients:
- Chicken (I used 4 tenderloins)
- 1 can diced tomatoes
- 1 can diced green chilies
- onion
- bell peppers (I used red and green for color.)
- 2 Tbsp vegetable oil
- chili powder
- cumin
- garlic powder
- dried oregano
- salt
- tortillas

Crock pot recipes are the best, toss everything in, (Except the tortillas), and let it cook on high for 2-3 hours. I didn't have guacamole or pico de gallo, but I had cheese, lettuce and sour cream (which is what I normally put on it. :) I have to say, I was pretty pleased with the recipe. My bell peppers and onions were frozen previously, so I think that effected the quality a bit, but still good. Next time, I'll play with the spices a bit more.


First time making homemade tortillas, not bad

Still steaming. YUMMY!
(These pictures are all taken with my phone.)

Going on my second...YUM! 


-SamiMae


Wednesday, January 22, 2014

Mexican Haystacks!

This is an awesome new meal I just tried tonight. :) The best part about this meal, is everything is something that I always keep on hand. I think there is a lot of flexibility with this meal. You can add spice add heat, or even another veggie/bean. Trevor and I even grabbed some chips to eat with it too.

Again, I'm not one to measure things out. I like to just throw it all in a pot and flavor it based on taste. A lot of times, I don't have everything that a recipe calls for, so I experiment. Here are the ingredients I used tonight:

Ingredients:
-1 can of corn (drained)
-1 can of black beans (drained)
-1 can of tomato sauce
-Salsa (I used a hot salsa and just poured a bit in)
-Taco seasoning (to give it some authentic flavor)
-Garlic clove
- Onions
-Water (about 1/2 cup)
-Chicken (I used leftover chicken from the can, nothing special.)
-Rice
-Cheese
- Sour Cream

I put the chicken in the pot and warmed it up. Then I put in the corn, black beans, tomato sauce, water, salsa, and water. I used dehydrated onions and mixed it in. I crushed a clove of garlic and put it in. It wasn't overpowering, very mild. I lightly sprinkled it with some taco seasoning and let is cook! I loved how fast this all warmed up. Where everything is already precooked, its just a matter of warming it up. During all this, I made 2 servings of Minute rice. I wasn't sure if I'd like it on top of rice, but it surprised me. It was perfect on the rice. By the time the beans and corn were warm, the rice was finished. We topped it with some cheese, and a little sour cream. YUM!

For this dish, I kept the sides simple. I served it with some carrots and ranch and some warm peanut butter cookies. (I spoil my husband. :)


This will be a recipe that I'll be making again! It's nice to make a meal from what I already have in my little pantry. This is also the perfect college meal, cheap, and made quite a large pot. I'm going to keep this meal in mind to make it again! 

-SamiMae


Sunday, January 12, 2014

Pineapple BBQ Chicken Quesadillas

I actually made this dish a few weeks ago and I don't think I have pictures, but let me tell you - it was YUMMY! This dish I will be making again. It was so super fast and easy, and the idea came from Pinterest. :) It was a hit!

Ingredients:
Tortillas
Shredded cheese
Can of chicken
BBQ sauce
Pineapple
Cilantro
Jalapeno (optional)

To make this dish, I drained the can of chicken and put it in a pan. I added some BBQ sauce and the pineapple. I used quite a bit of  pineapple juice to keep it moist. I diced up a jalapeno real fine and only added a tiny bit. So, I cooked all these items in a pan to warm them up. After they were warm, I moved the mixture onto a tortilla, on a skillet. Before I folded the tortilla in half, I added on some cheese and a some cilantro. I folded the tortilla over, (so it's in half) and cooked it until it was golden brown on both sides. This let the cheese melt and hardened the tortilla just a bit to make it crispy.

After it was cooked, we dipped it in sour cream. This was a super quick and tasty dish. Next time I make it, i'll pictures. Give this recipe a try. It was AWESOME!

-SamiMae

Saturday, January 11, 2014

Tin Foil Dinner - Carolina Country

Earlier this week, I made tin-foil dinners. It was supper yummy and was made from everything I have on hand. The items I used are common items in my kitchen, so this is a great meal to make, just about any time. I didn't have any kind of marinade, or teriyaki sauce to put on it, so I tried something new. I'm a huge fan of the Grill Mates season packets. (My favorite is their Montreal steak) For this dinner, I used Carolina Country marinade. It was an excellent choice. :)

Ingredients: 
Potatoes
Carrots
(Frozen) sliced green and red bell peppers
Sliced (can be frozen) onion
Chicken tenderloin 
Grill Mates seasoning packet: Carolina Country

It's super easy. Put it all together in tinfoil. Pour the seasoning on it, wrap it up and cook it at 350 degrees for about 45-60 minutes. I found that the potatoes were perfectly soft and the carrots were cooked well too. We cooked ours for 60 minutes and that was just perfect. I love meals like this, because then I have about 15 minutes of prep work and then an extra hour to do whatever!

The flavor was amazing in our tinfoil dinner.. The meat was moist and fell apart easy. The veggies soaked up the seasonings. The seasoning wasn't too spicy. Trevor loved it. :) I served this with a side dish of green salad. Wa-La! Dinner is served. I can't wait to make this dinner again! 


Looks tasty huh! 


- SamiMae

Tuesday, January 7, 2014

Veggie Grilled Cheese!

So, one of my New Year's goals is to cook one new recipe a week. This week I cooked grilled cheese with a twist. (I found the recipe on pinterest). It was new and certainly interesting. It's a vegetable grilled cheese.

Ingredients:
Whole grain bread
Sliced cheese
Green peppers
Sliced Roma tomatoes
Spinach.

Make is just like a grilled cheese, but put 2 green pepper rings, 4 slices of tomatoes and a handful of spinach. I'd recommend cooking it on low on the stove. You want your cheese to melt, but not burn the bread. You also want it to cook all the way through, so the veggies are tender and warm.


Not bad, right? :) (Ignore everything in the background. :) I was worried about the peppers being cooked all the way, and I had never had any kind of cooked spinach. Spinach is one of those veggies that I'm really working on liking. This sandwhich, as simple as it it, was a stretch for me, but turned out to be really yummy! When I make it next, I think I'll add some bacon onto it. As Trevor and I sat, eating our sandwhiches, we craved bacon on it.

We also served this with a simple side of baby carrots and ranch. I'm all about healthy dinners, and this sure was one! I'll definitely be making this again! :)

Saturday, October 26, 2013

DINNER IN A PUMPKIN!

This was super fun to make. Not only did we get to get and carve 3 pumpkins, we also got to do it to a small pie pumpkin tonight! We were feeling festive and did dinner in a pumpkin! It turned out great and yummy! We had apple juice with it. It was a very fall meal.

Ingredients:

  • A pumpkin (can use a squash, don't recommend a spaghetti squash thought)
  • ground beef
  • onion
  • green bell pepper
  • corn
  • rice, I used brown
  • can of Cream of Mushroom 
  • Salt and pepper to taste


Here's what I did:

1. Start cooking the brown rice (or any other rice).
2. Start cooking the hamburger, be sure to really give it some good pepper and worcherstershire. This is where most of the flavoring is
3. After the hamburger is cooked toss in some green bell peppers and some onion, both of which are sliced up.
4. After the rice is done, mix it in with the hamburger mixture, along with a can of cream of mushroom soup and a can of corn.
5. Stir the mixture good. Test taste it and add in any extra seasonings you feel it may need. I added a bit extra salt.
6. STUFF THE PUMPKIN!!! This is the funnest part. :)
7. Cook at 350 degrees for about an hour. My pumpkin was small, so it took about 45 minutes. To test if the pumpkin is done, just poke the outside with a fork. You'll be able to tell if it's done, by how soft it is.


It turned out great for us! The things I would do different are: 1) I would have used better quality of hamburger and rice. We had walmart beef, which is a no go. The meat has been tough and there is a big difference in flavor. I bought the cheap rice. We could tell, a better quality of meat and rice would have really improved the meal, but as far as everything else goes, it was great.

This meal is really forgiving, there is no way to mess it up. Be careful when eating, the rice retains the heat, so it stayed hot the whole time we were eating. This little pumpkin was plenty for the both of us, but I would only recommend that this is a meal for 2 people. If feeding more, use a bigger pumpkin, or more. Trevor also has the metabolism of 3 people and can eat a lot. lol. We ate most of it all together. :)

Here are our pictures from our meal!


All cooked and ready to eat! It smelled so good!

We had extra rice mixture, so we just cooked it with the pumpkin.

The juices were just oozing out!

We cut the pumpkin in half and both just took forks to it to eat!

YUMMY! LOOK AT WHAT WE GET TO EAT FOR DINNER!

Time to dig in!!!!